
Image preprocessing procedure with SIRIL
This page describes the procedure for the image preprocessing with SIRIL
- 1. Purpose of preprocessing
- 2. Filtering captures
- 3. Search for past candidate sessions
- 4. Image Library
- 5. Creating the Preprocessing Project
- 6. Launch of SIRIL preprocessing (driven by Sirilic)
1. Purpose of preprocessing
This page describes the procedure for preprocessing raw images which is the essential step before processing the final image.
The pre-processing process involves filtering the defect-free raw images acquired with the help of the N.I.N.A. tool, creating the calibration images and processing the raw images with pre-processing, alignment and stacking algorithms basically.
As a reminder, reducing noise in the final image to be processed is obtained by stacking a large number of raw images. This is because the signal-to-noise ratio (SNR) increases with the square root of the number of stacked images. Thus, to increase the SNR by a factor of 1.4, it will be necessary to double the number of images.
Detailed explanation of signal to noise ratio
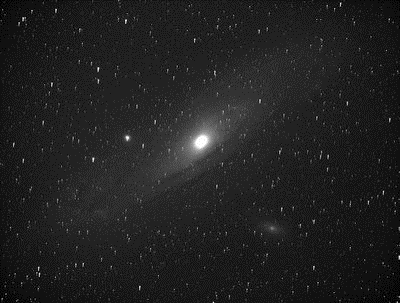
Here is a comparison between an image made from 43 raw images preprocessed, aligned and stacked with SIRIL and a single raw image (H-Alpha filter, exposure time of 480s, sensor cooled to -20°C)
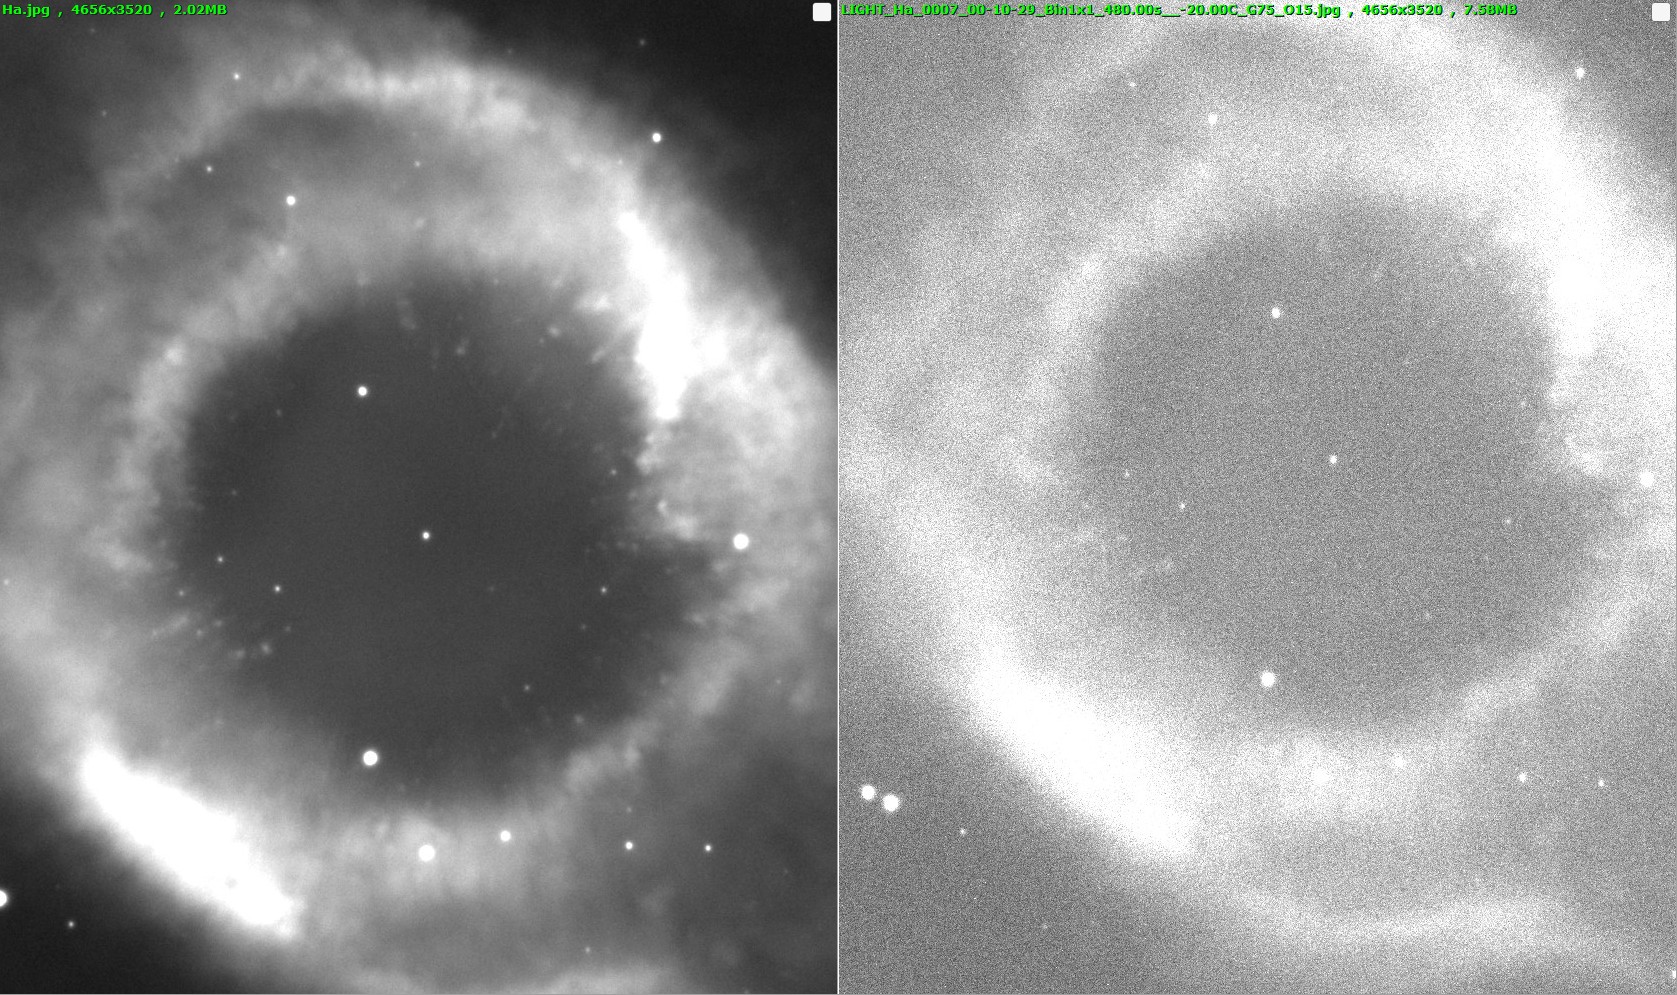
We notice that there is still a little noise in the final image which has an SNR
gain of 6.5: an SNR gain of 8 or 64 stacked images would have been preferable.
2. Filtering captures
This filtering step will make it possible to avoid taking into account in the
preprocessing process images with significant defects visible to the eye.
It is not mendatory as this filtering can be carried out automatically during the
preprocessing step with the SIRIL tool:
- Selection of the "average with rejection" stacking mode which allows images with so-called "deviant" pixels to be deleted iteratively (satellite or airplane trails for example). This is very practical in the context of short exposure acquisitions which generate a very large number of images (> 10,000)
- Selection of one or more criteria on the quality of the background of the sky or the stars which makes it possible to eliminate images with a sky that is too clear or images that are too blurry linked to the quality of tracking or atmospheric turbulence.
2.1 Creation of “quick looks”
In order to be able to sort all the raw images created in the default "FITS" format, you will have to create so-called "quick look" images. These images will be compressed images in JPEG format and with a histogram stretching to better see the defects.
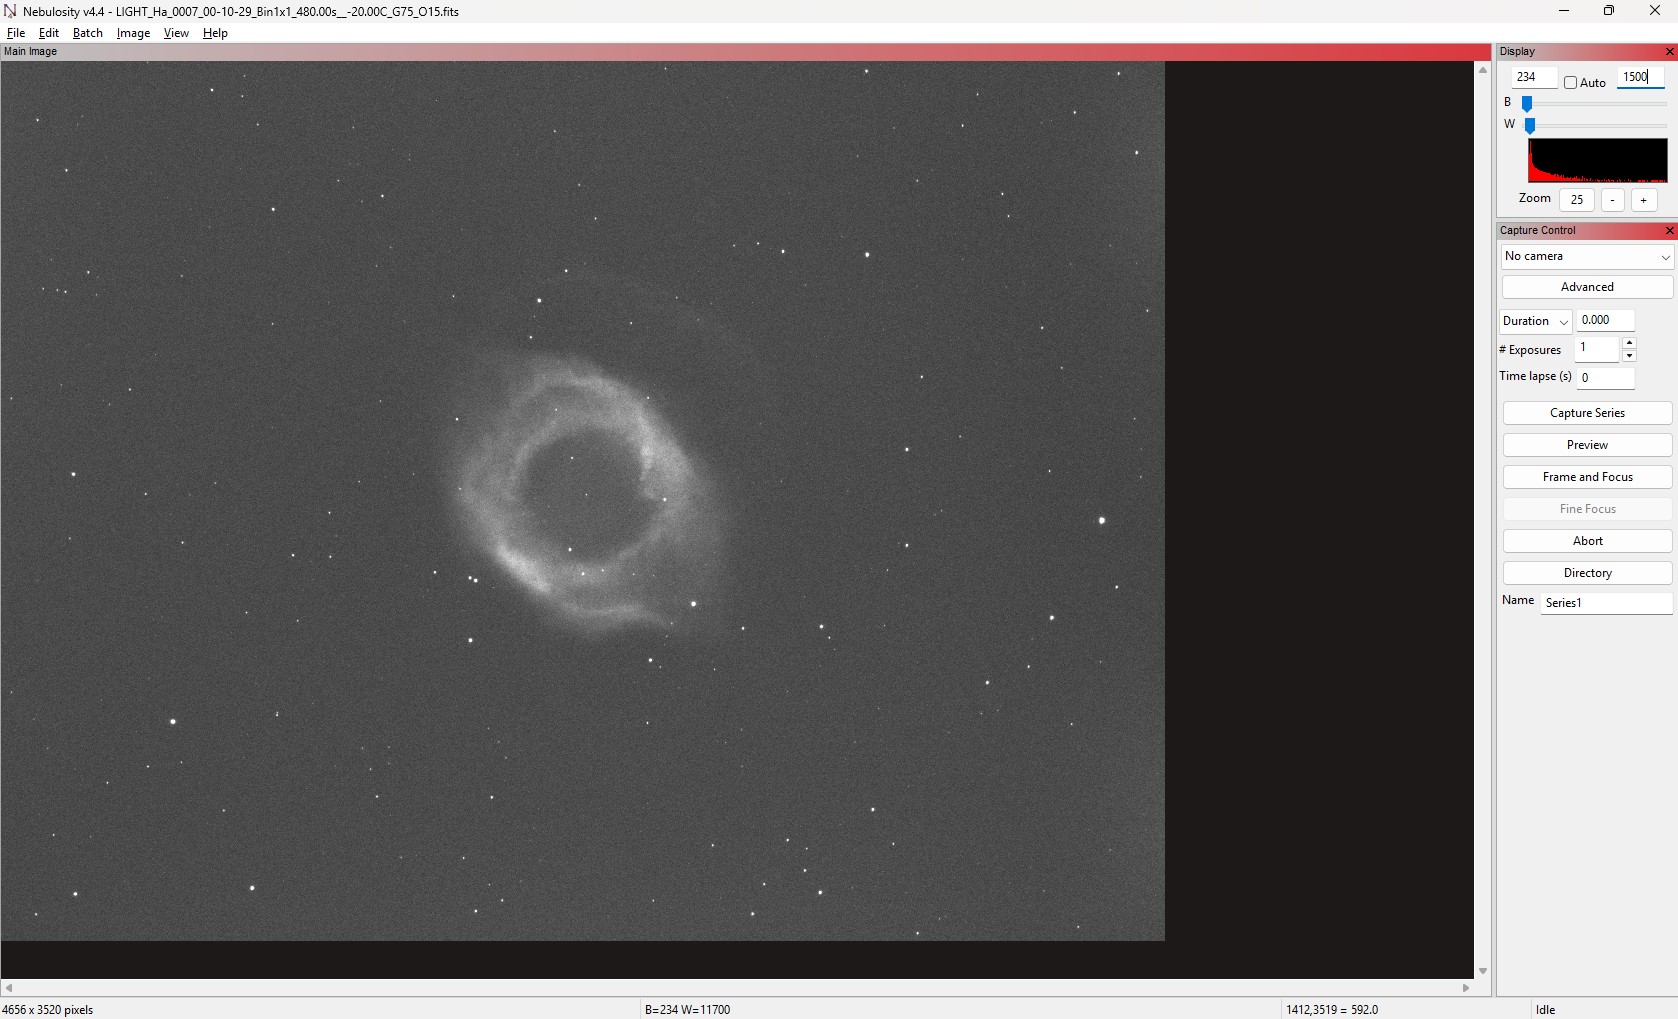
I use the Nebulosity tool which allows batch processing of raw images, here is the procedure:
- Open a single raw image for a chosen filter which will serve as a reference for other images of the same filter and adjust its size on the screen

- You must uncheck "auto" to be able to modify the histogram which is too dark
with the default values of Nebulosity so as to clearly see the object.
2 settings are possible: cutting dark tones and cutting light tones
In general, only clipping white tones is enough to make the object stand out.
- To batch process images taken with the same filter and with the same histogram adjustment that has just been made, simply go to the “Batch/Batch Conversion/FITS to JPG” menu.
- In the window that opens, select all the desired images then click on “Open”
- Batch processing begins with a tracking indicator at the bottom of the window
- We can continue with the other raw images taken with other filters as well as the “flat” calibration images
2.2 Filtering raw images
To filter raw images, I use the "FastStone Image Viewer" tool which allows you to
select and filter "quick look" images easily. Various useful features are present
such as displaying the histogram or comparing 2 images in "side by side"
display.
2.2.1 Manual filtering of “quick look” flats
The filtering of "quick look" images of "flat" calibration is carried out only at the histogram level. Indeed, these are generally taken in succession and with constant lighting but it happens that some are a little overexposed (histogram clipped towards the highlights)

Each retained “quick look” image is moved to a folder named “PREVIEW/RETAINED”.
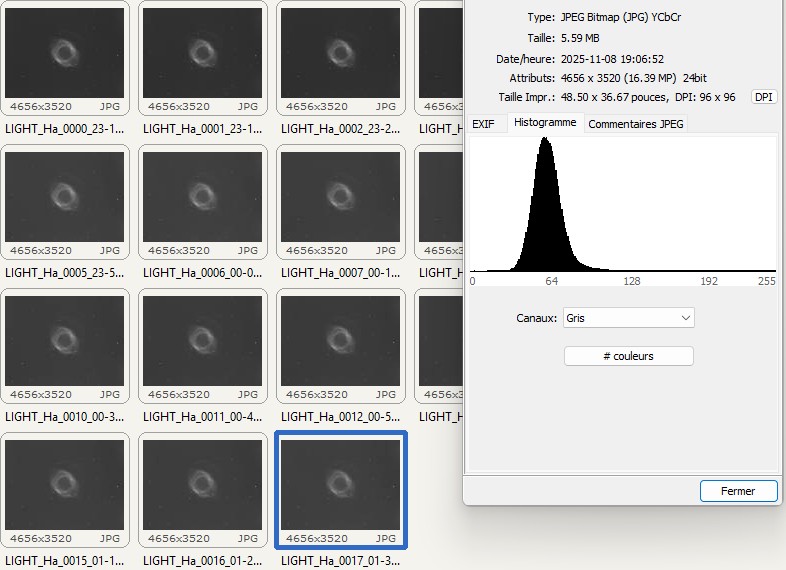
2.2.2 Manual filtering of “quick look” objects
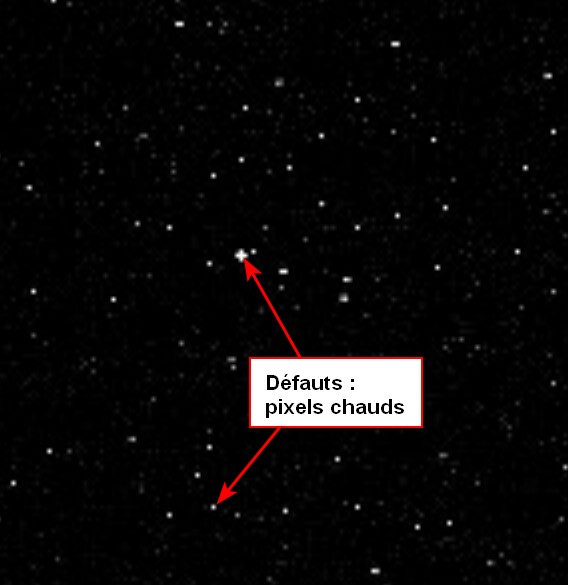
Filtering the raw "quick look" images of objects should make it possible to retain only images without major defects and with a histogram as narrow as possible towards dark tones.
- To exclude: median of the histogram > 64 (sky background too light)
Filtering the sky background can be done automatically with SIRIL at the “sky
background” criterion.
- To exclude: trails from planes or satellites that are too bright

Filtering of trails can be done automatically with SIRIL with the stacking mode with
rejection of deviant pixels
- To exclude: cloudy periods
Filtering the sky background can be done automatically with SIRIL at the “sky
background” criterion.
- To exclude: tracking problem
This filtering is less important because we will see that the tracking problems can be filtered directly at the level of the SIRIL tool by playing on the FWHM and roundness criterion of the stars which will exclude stars that are too elongated beyond this threshold.
Each retained “quick look” image has to be moved into the folder named
"PREVIEW/RETAINED”.
2.2.3 Automatic filtering of raw images and flats
A bash script executed from WSL, which is the Windows Linux Virtual Machine, is responsible for doing the same filtering action but automatically for the raw images of objects and flats based on the manual sorting of "quick looks" already carried out.
This script will move the raw images into the “RAW/RETAINED” directory identical to what the "PREVIEW/RETAINED” quick look directory contains.
3. Search for past candidate sessions
The goal of this step is to find previous raw images of the same object and taken under the same conditions (focal length, field rotation, imager, filter, etc.) so as to be able to align them.
The objective is to increase the signal/noise ratio as described previously: the more images we stack, the better the SNR will be.
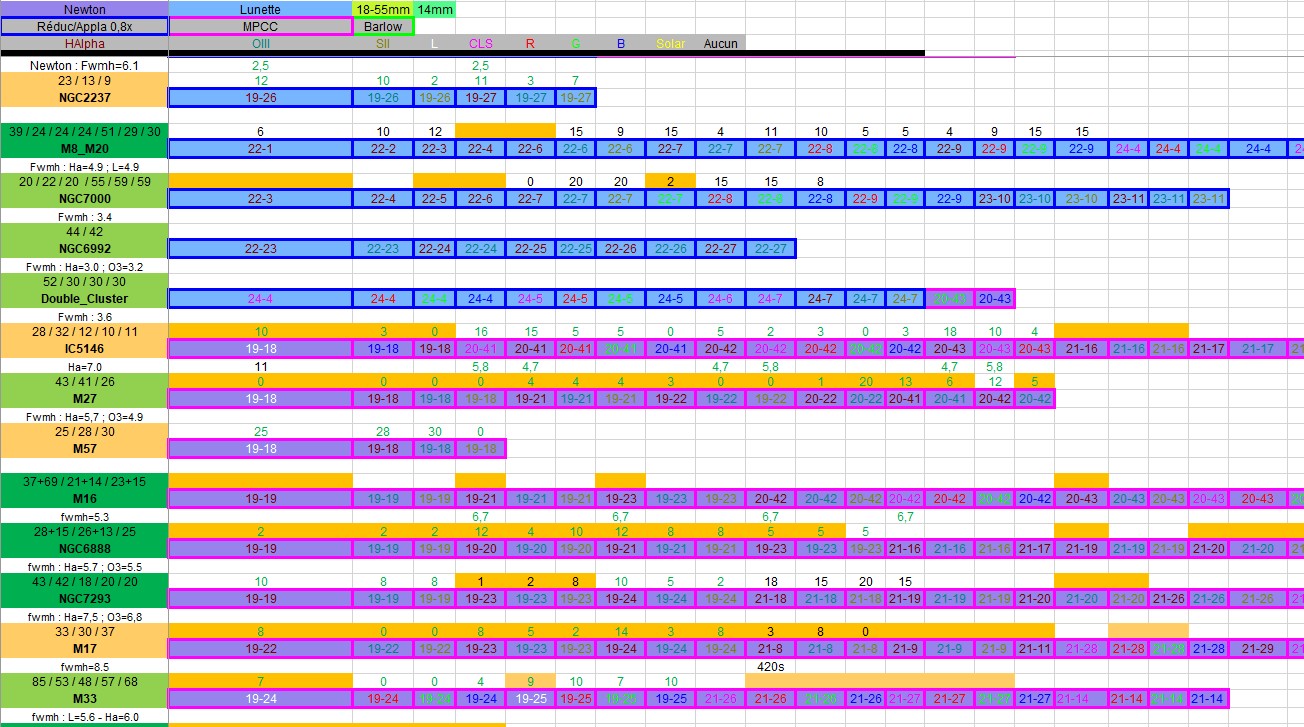
For this purpose, I note down all my sessions in a spreadsheet with:
- Session identifier (Year-Number)
- Imager (telescope or refractor)
- Object name
- Filter used
- Field corrector
Example with filtering of sessions on the “NGC7293” object:
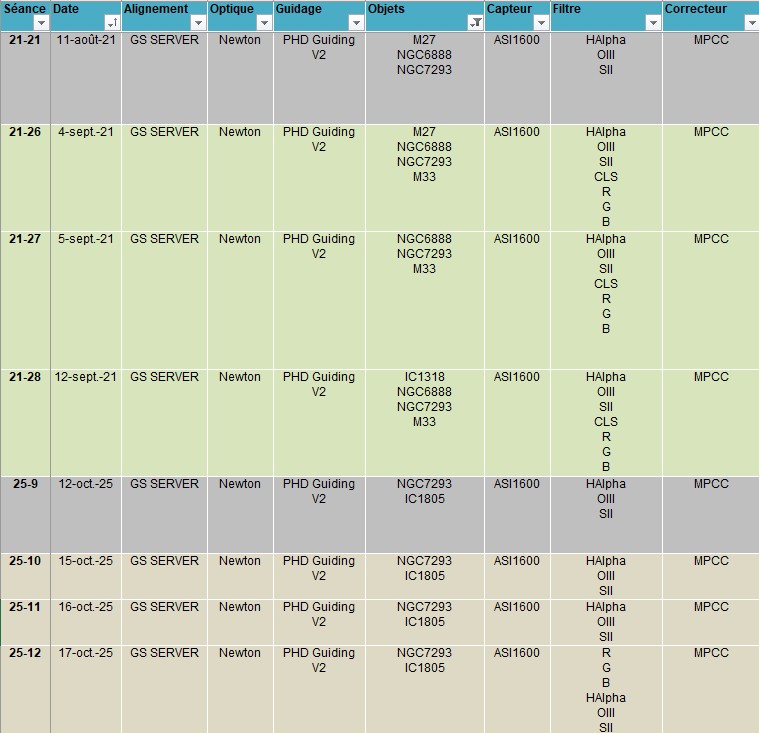
A script written in Visual Basic allows you to generate a tab which summarizes all the sessions carried out by object with its characteristics (imager, corrector, filter)
This spreadsheet is therefore very practical for identifying all the images of the same object taken under the same conditions and which can be selected for the preprocessing process.
4. Image Library
The raw image library is stored on a local disk with double backup (2nd mirrored local disk and Cloud)
4.1 Creation of the offset library
To produce “offset” calibration images with only the dark current of the sensor, simply:
- Cover the camera
- Set the exposure time to the minimum value
- Set the same camera gain/offset as for raw object images
- Produce a large number of images (approximately 50 to 100) in order to obtain a master offset which is representative of the statistical series (median)
Offset calibration images do not need to be taken at each acquisition session but
approximately every 1 to 2 years as the sensor ages.
We can therefore build up a library of offsets with different sensor temperature and
gain settings to correspond to the different raw images of the objects to be
preprocessed.
Example of an “offset” type calibration image:

4.2 Creation of the darks library
To produce the “dark” calibration images corresponding to the thermal noise, you must:
- Place the camera in a room without light (the protective cover of the imager is not sufficient because it lets some light through, especially with an optical divider already mounted)
- Cover the camera
- Set the same camera gain/offset as for raw object images
- Take a large number of images (approximately 50 to 100) in order to obtain a dark master which is representative of the statistical series (median)
- Set the same exposure time as for the raw images of the objects
Dark calibration images do not need to be taken at each acquisition session but
approximately every year as the sensor ages. If we see new hot pixels appear after
preprocessing, then we will have to redo the dark library for the temperature
concerned.
We can build a library of darks with different sensor temperature and gain settings
to correspond to the different raw images of the objects to be preprocessed.
Example of a “dark” calibration image:
4.3 Creation of flat calibration images
Unlike the "offset" and "dark" calibration images, the "flat" calibration images (known as "flat field") must be produced under the same conditions as the raw images of the objects and therefore at the end of each session because dust can be added between two sessions and the focusing will not be strictly identical.
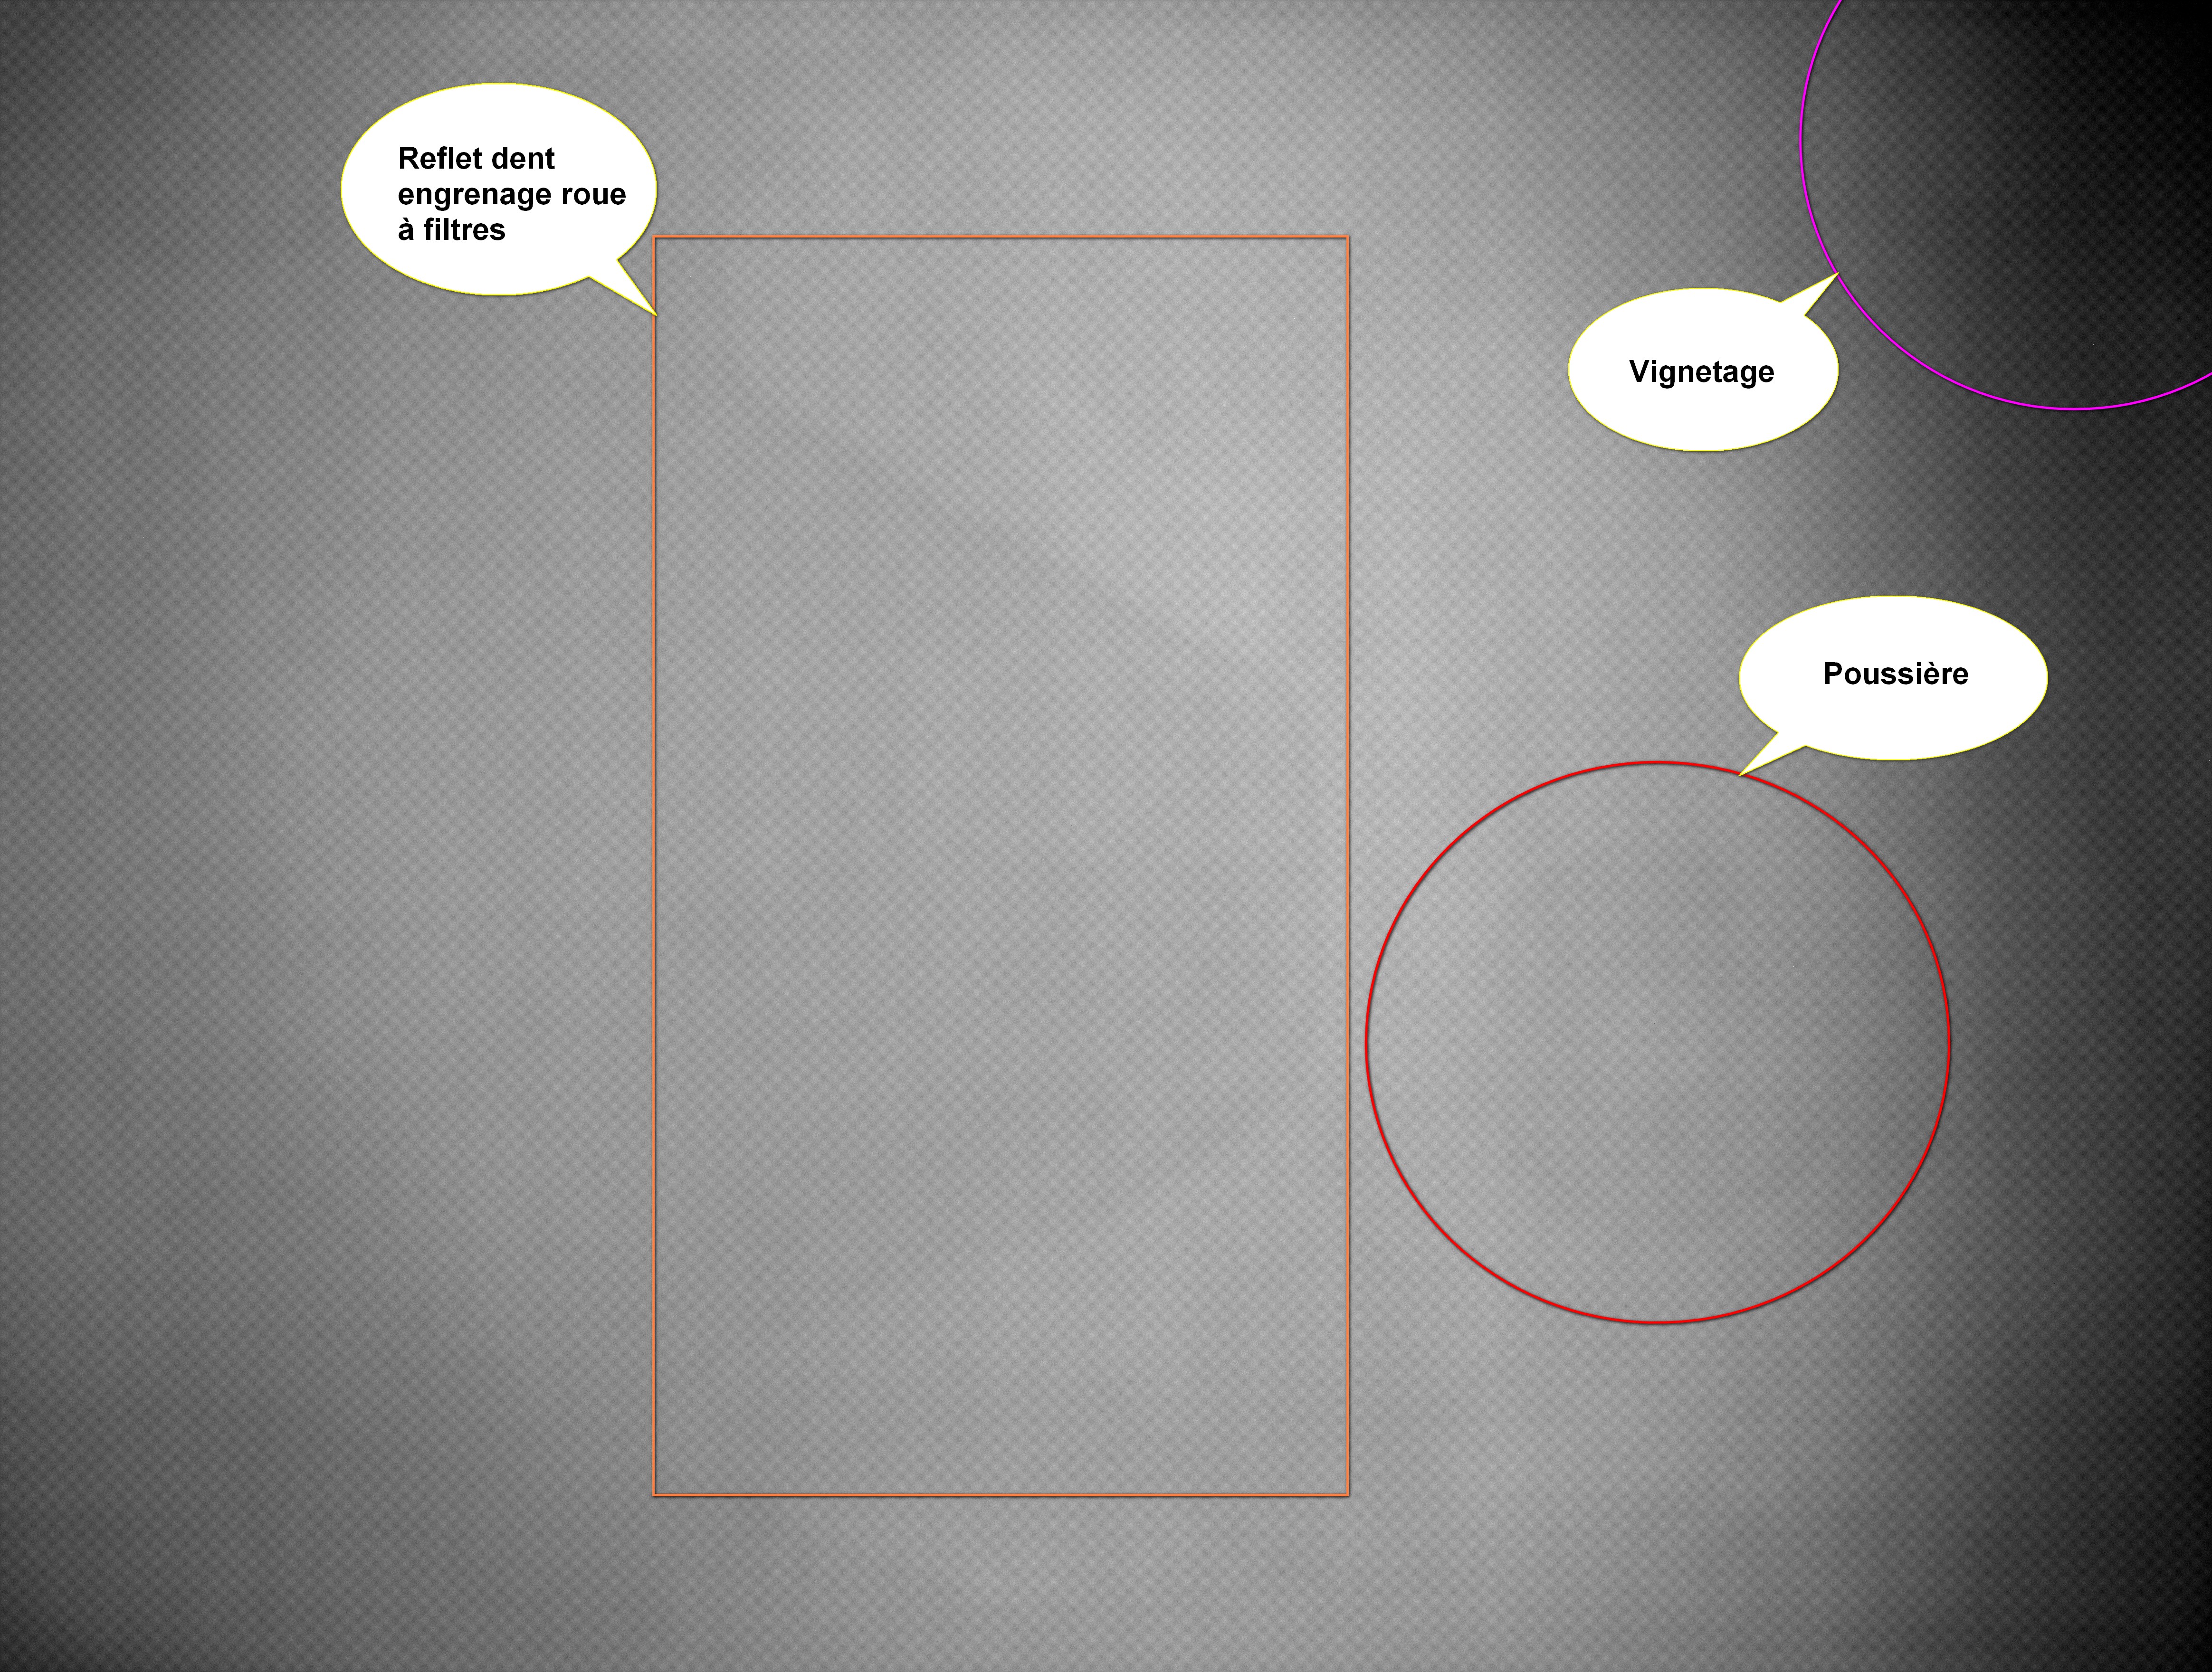
Example of a “flat” calibration image:
4.3.1 Conditions for taking flats
- Maintain the same focus as for the raw images of the objects
- Make a flat per filter used during the session
- The temperature of the sensor is less important but you must ensure that it is not too high in order to limit noise in the image (below 0°C is preferable)
- Position a neutral, uniform and stable light source in front of the imager and adjust the exposure time so as to have a histogram approximately 2/3 full
- Take a large number of images (approximately 30 to 50) in order to obtain a
master flat which is representative of the statistical series (median)
4.3.2 Flat calibration
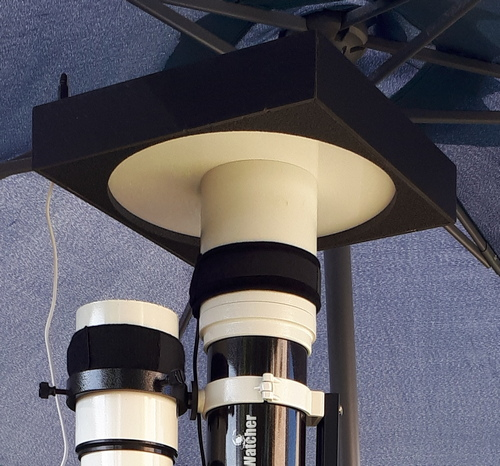
Concretely, I use a dedicated luminescent panel from the Lacerta brand whose lighting
power I deliberately reduced, which was much too strong, by placing a resistor on
the power circuit.
It is very practical to implement because it is directly controlled by the NINA
application via a USB-connected controller from the same brand.
Simply select the filters used during the session for which you wish to create flats via the calibration tool integrated into the NINA application.
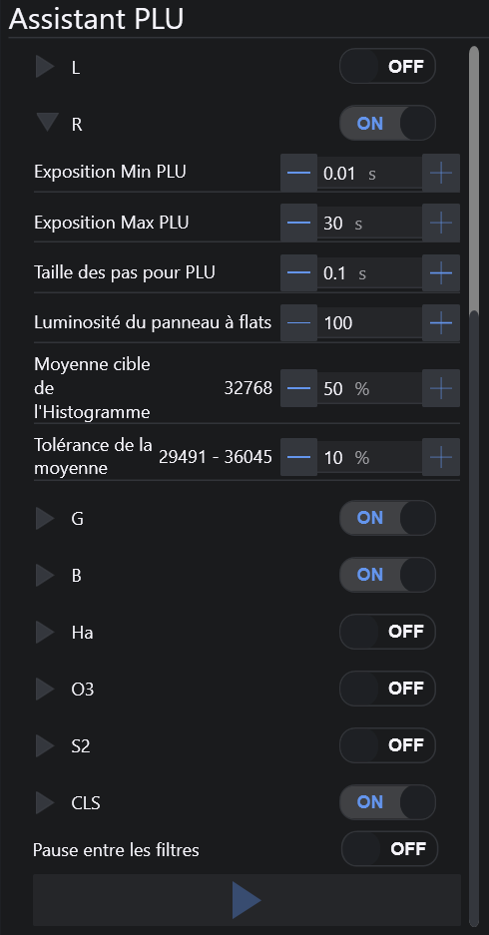
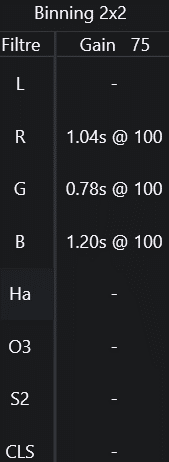
Thus, the exposure time of each filter is calculated automatically:

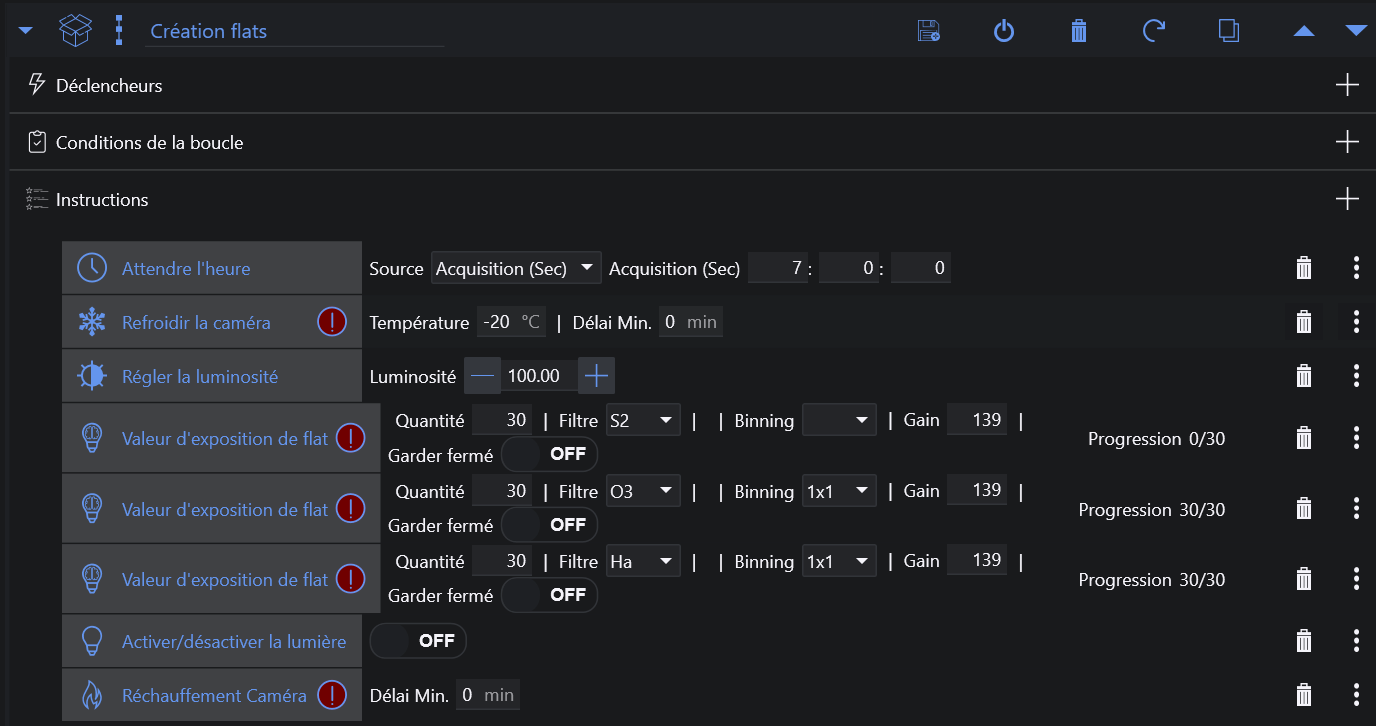
4.3.3 Programming the flats
Once the flat calibration step has been completed for each of the filters, simply add
the programming in the NINA application.
(The alert indicated opposite each programming must disappear if the calibration has
been carried out because a exposure time is present in the flat calibration table)
4.4 Organization of offset and dark calibration images
Offsets and darks do not need to be redone at each session because these defects evolve very slowly over time. However, it will be preferable to update this library every year.
The structure of the folders of the library of raw offset and dark calibration images is as follows:
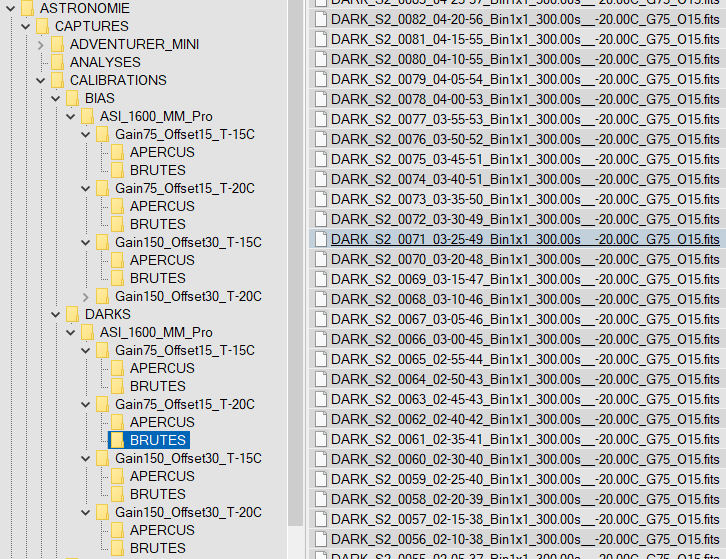
The raw images are sorted by calibration type (offset or dark), by sensor, then by
camera gain, camera offset and temperature.
Each series of raw images is stored in a “RAW” directory and the associated “quick
look” images in an "PREVIEW" directory.
4.5 Organization of raw flat images and objects
This library contains both the raw images of the objects and also the raw images of the flats corresponding to each session. Indeed, the "flat" calibration images must be taken at the end of each session because it is necessary to recover the defects linked to dust and focusing essentially which can change with each use of the equipment.
The folder structure of the raw images and flats library is as follows:
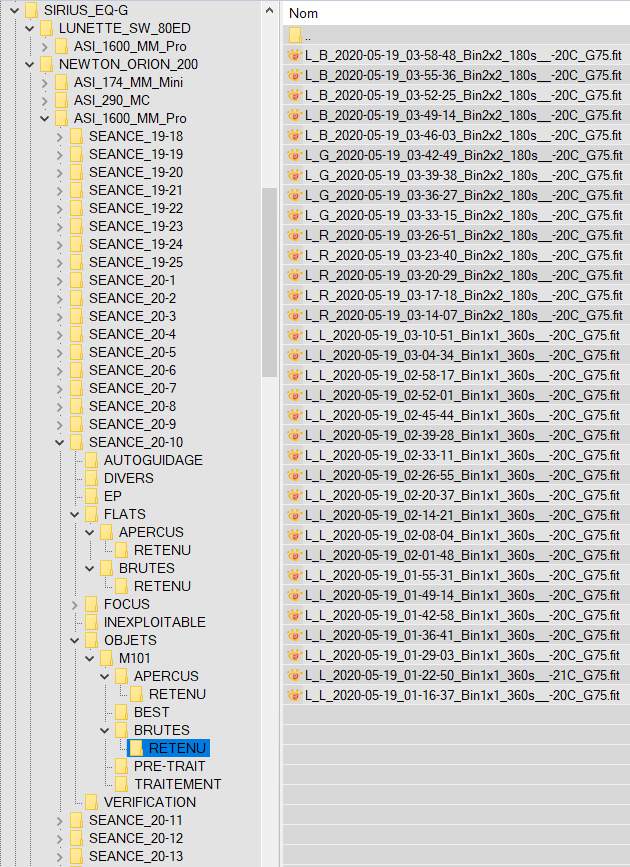
The raw images are sorted by imager (scope, telescope, etc.), by sensor (ASI1600MMPro, EOS450D, etc.) and by session.
Each “SEANCE_AA-XX” directory contains the following main directories:
- AUTOGUIDAGE: contains the quality data of the autoguidance carried out
- EP: data of the periodic error of the mount if it is carried out
- FLATS:
- PREVIEW / RETAINED: contains the “quick look” images of the flats which are retained during manual filtering
- RAW / RETAINED: contains the raw images of the flats which are retained for preprocessing
- FOCUS: contains the json data of the automatic focuses carried out by NINA
- OBJECTS:
- OBJECT_NAME:
- PREVIEW / RETAINED: contains the “quick look” images of the object which are retained during manual filtering
- RAW / RETAINED: contains the raw images of the object which are retained for preprocessing
- OBJECT_NAME:
5. Creating the Preprocessing Project
5.1 Interest of Sirilic
The preprocessing tool I use is called SIRIL
Before launching the tool, you must add all the raw images of the objects and
calibrations. This step is all the more tedious as we have a large number of images
distributed in various directories.
To make the task easier, there is a tool called Sirilic which allows you to generate a script directly usable by SIRIL.
So that this script can be generated from our raw images, 2 methods are possible:
- Load files by image category and by session from the Sirilic interface but quite tedious
- Automatically generate the project file which will then be loaded from the Sirilic interface.
So this is the 2nd solution that I chose.
5.2 Automatic generation of the project in Sirilic format
In order to automatically generate the project in Sirilic format, I developed a bash script which is launched directly under WSL, which is the Windows Linux Virtual Machine.
The script is configured with the following raw image name formalism (modifiable in
the NINA settings):
LIGHT_Ha_0007_00-10-29_Bin1x1_480.00s__-20.00C_G75_O15.fits
- Image type: BIAS / DARK / LIGHT / FLAT
- Filter type: L, CLS, R, G, B, Ha, O3, S2
- Id: 0000 to 9999
- Date: YY-MM-DD
- Binning: Bin1x1 or Bin2x2
- exposure time (s): XXX.00s
- Sensor temperature (°C): -XX.00C
- Camera gain: GXXX
- Camera offset: OXX
Script arguments:
- Object name
- Filters chosen for preprocessing among: L, CLS, R, G, B, L_Ha, Ha, L_O3, O3, S2 (L_Ha: Ha filter in Bin1x1, L_O3: O3 filter in Bin1x1)
- Sessions that you want to stack (separated by a space)
Example of launching the script:
./creation_projet_sirilic_v3.sh NGC7293 L_Ha,L_O3,R,G,B SEANCE_19-19 SEANCE_19-23 SEANCE_19-24 SEANCE_21-18 SEANCE_25-10 SEANCE_25-11 SEANCE_25-12
This script will perform the following steps:
- Creation of the list of all images from the libraries of calibration images and raw session images
- For each session in the list of arguments:
- For each filter in the filter list:
- Added raw images of the object to the project file
- Search for exposure time
- Search sensor temperature
- Search for camera gain
- Addition of compatible “offset” calibration images to the project file
- Added compatible "dark" calibration images to the project file
- Added compatible "flat" calibration images to the project file
- Control of the homogeneity of the gains / offset / binning of the images found
Example of Sirilic project file generated with 5 filters and from 7 sessions : NGC7293_L_Ha_L_O3_R_G_B.prj (Log file)
Example of loading a project in Sirilic :
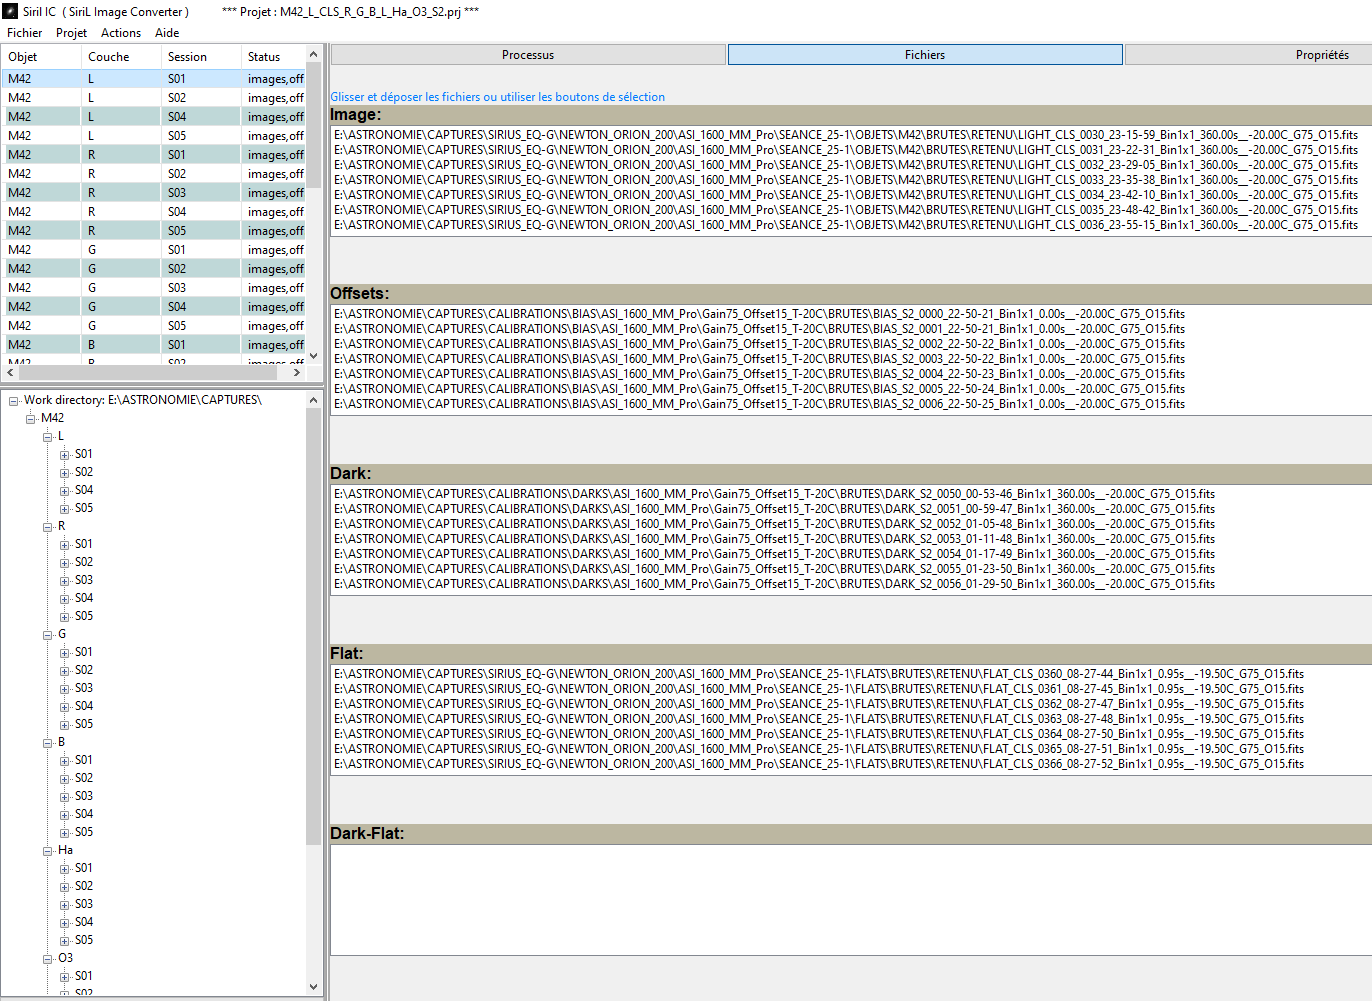
Note that the display is sorted by filters and then by sessions.
We can check in the right view that the file types are correctly arranged in the
Images, Offsets, Dark and Flat categories and that they are homogeneous with each
other in terms of exposure time, temperature and binning.
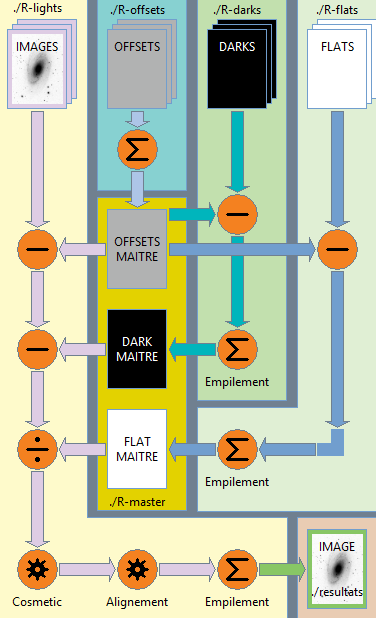
6. Launch of SIRIL preprocessing (driven by Sirilic)
Preprocessing the raw images of objects consists of removing most of the defects:
- Dark current
- Thermal noise (hot pixels)
- Dust, vignetting
The following formula is applied:
preprocessed_image = ( raw_image - offset_master - (dark_master - offset_master) ) /
(flat_master - offset_master)
6.1. Pass 1
Once the Sirilic project has been generated with the desired sessions, simply load it into the Sirilic app.
Default preprocessing chain for each type of raw calibration images:
- Subtraction of the offset for dark and flat raw images
- Stacking with rejection of each raw series (offset / dark / flat)
- Normalization of the preprocessed calibration image called "master" calibration image
You must then check and adapt the desired settings => check "Subtract offset" in the properties for images, offsets, darks and flats
Preprocessing chain for raw object images:
- Subtraction of the master offset for each raw image (defects related to dark current are removed)
- Subtraction of the master dark for each raw image without the master offset (defects linked to thermal noise are removed)
- Division by the flat master for each raw image without the master offset and without the dark master (defects linked to dust and vignetting are removed)
- Alignment of raw images (without master offset, without master dark and divided by master flat)
- Stacking with rejection (or registration) of aligned raw images (without the master offset, without the dark master and divided by the master flat)
- Normalization of the final preprocessed image
Before launching the preprocessing process for the first time, you must adjust the settings in the “File/Preferences” menu:
- Indicate the working directory
- Check "Save a copy in tif format" (if processing step outside the PixInsight App)
To start the pre-processing process, you must:
- Start step 1: construction of folders
- Start step 2: build and run the Siril script
6.2. Pass 2
At the end of the preprocessing of pass 1, the Siril application opens.
To better see the preprocessed images, you must select “Auto adjustment” from the
drop-down menu at the histogram level at the bottom of the application.
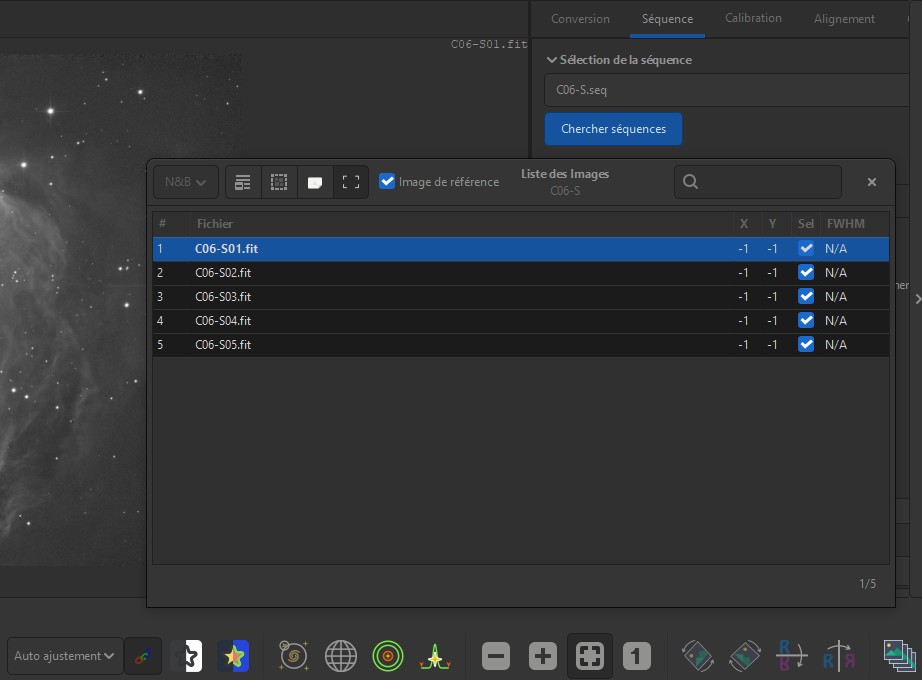
6.2.1 Filtering sessions
This step consists of viewing the intermediate preprocessed images by filter and for each session in order to eliminate those which are not satisfactory (defects, sky background too bright, other, etc.):
- Click on the “Working directory” icon (top left) and select the “Temp” directory
- Click on the “List of images” icon (bottom right) to bring up the corresponding menu
- Click on the “Sequence” menu (top right) and select in turn the sequence
corresponding to the “C0X-S.seq” filter with X (in my case):
0: Luminance
1: Red
2: Green
3: Blue
4: H-Alpha
5: O3
6: S2 - In the “List of images” menu, select each of the images corresponding to each session in order to check if the preprocessing is satisfactory
- If a session for a given filter is not satisfactory, you must remove it from the Sirilic project: simply select the corresponding session and click on “destroy an image” in the “Project” menu.
6.2.2 Star quality filtering for luminances
In order to obtain a beautiful preprocessed image as input to the processing stage, it is important not to keep the raw images which will be used for luminance processing and which have had a tracking problem.
For this, Siril offers a graph which allows you to see the quality of the images at star level with different sorting criteria.
On a preprocessing of M42 with Siril, I exported the different criteria in order to compare them with each other in terms of their impact on the quality of the images (43 preprocessed images in total):
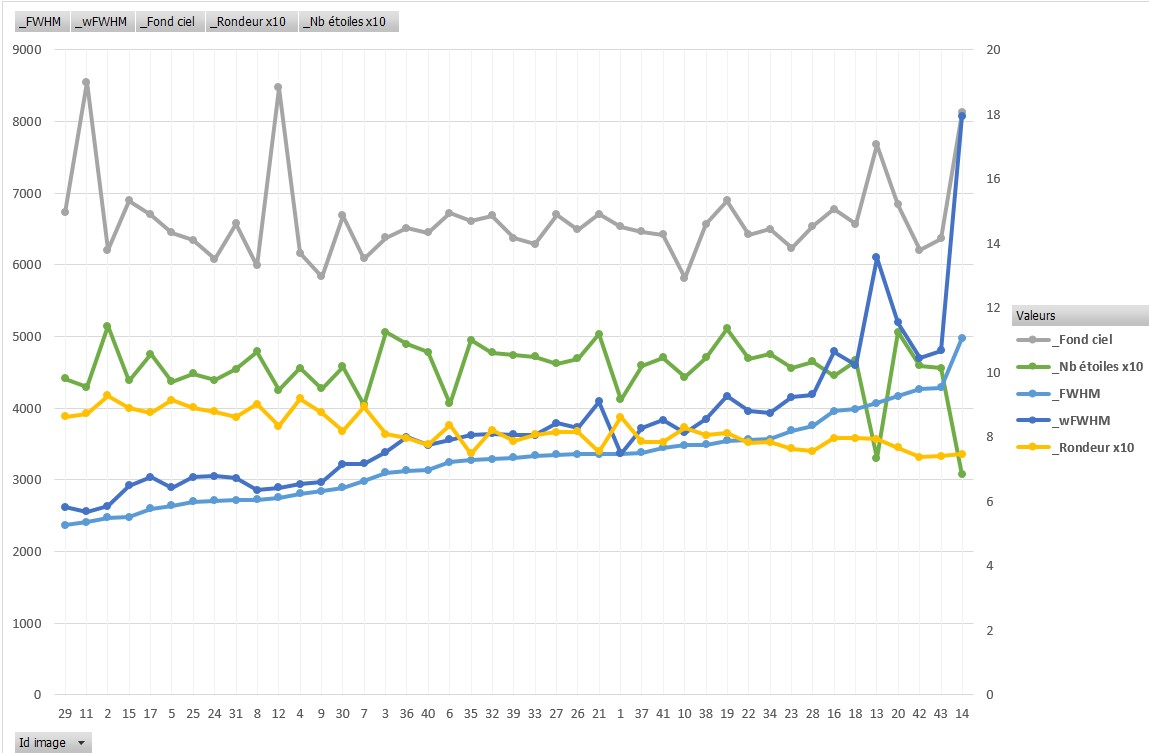
- We see that the criteria "background of the sky" and "number of stars" do not significantly affect the quality of the images. We still note that a significant drop in the number of stars degrades the quality in terms of the wFWHM criterion but it would be necessary to observe this on other preprocessings to ensure this.
- On the other hand, it clearly appears that the degradation of the roundness of the stars leads to a drop in quality in terms of the FWHM and wFWHM criteria.
- Regarding the difference between the FWHM and wFWHM criteria, we can note that the latter reveals more quality defects than its raw version FWHM.
In conclusion:
- If we only use the FWHM or wFWHM criterion, we can ensure good filtering on the quality of the images retained for stacking.
- If we add the "roundness of the stars" criterion, this also allows us to remove images with stars which are not very round and which present a tracking problem.
- Using the sky background criterion will make it possible to not keep images for which the useful signal is too weak compared to the sky brightness signal (light pollution, Moon, etc.) and therefore the details of the objects will not be visible enough
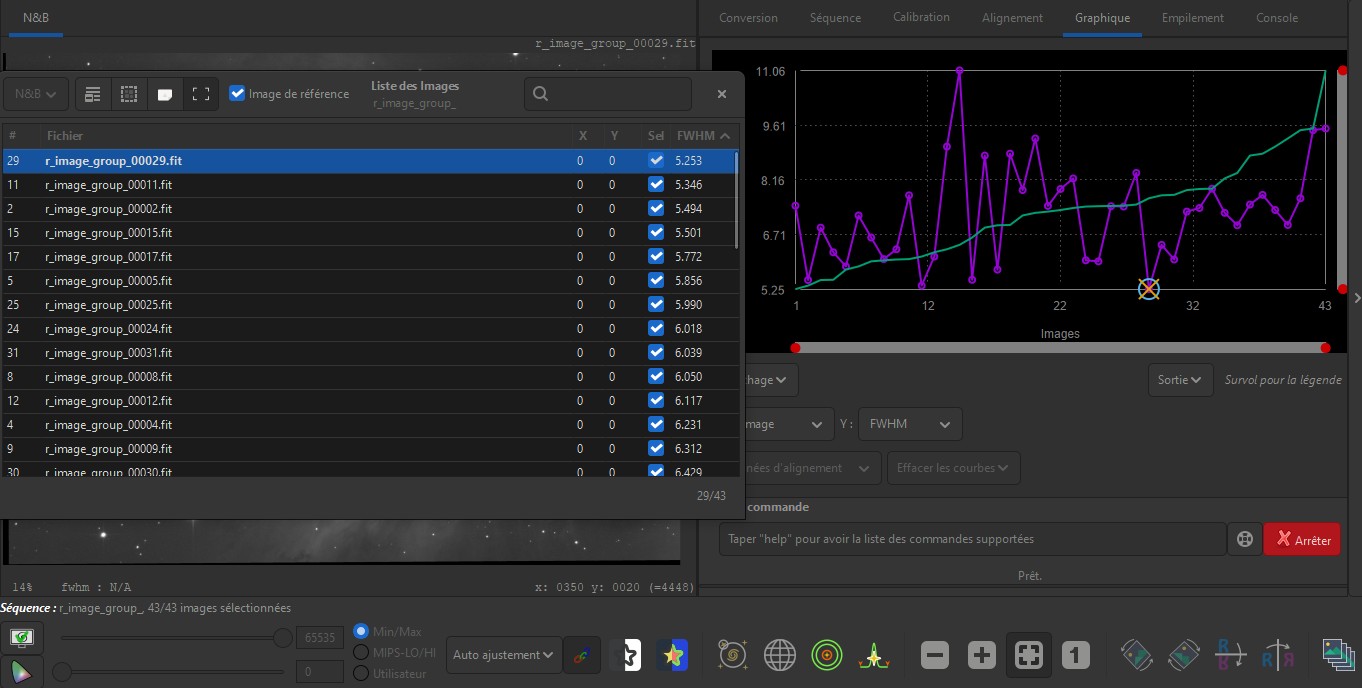
Example with the “FWHM” criterion:
- Click on the "Working directory" icon (top left) and select the directory which contains all the preprocessed luminance images (L or H-Alpha): "<L or Ha>/GROUP"
- Click on the “List of images” icon (bottom right) to bring up the corresponding menu
- Click on the “Sequence” menu (top right) and select the sequence “r_image_group_.seq”
- Select the “Graphics” menu
- Look at the green curve “increasing FWHM = f (number of images)” and look at how many images the FWHM criterion deteriorates
- A minimum number of images must be kept to obtain a sufficient SNR (signal to noise ratio) while eliminating excessively high FWHMs.
Here is an example where it appears that converging 34 preprocessed images for a max FWHM equal to 8.0 seems a good compromise (just place the mouse cursor on the curve to read the values):
6.2.3 Restarting preprocessing
In order to save a little time in the process, we can recover the offset and the dark
master already created during pass 1 of a session only if the latter are identical
to all the preprocessed sessions (including binning)
In this case, you must check at the "Project" menu: "Define offset and darks masters
for all projects" and select the directory where you copied the master calibration
images
Steps remaining to be carried out before restarting the pre-processing process from Sirilic:
-
It is necessary to ensure that all the sessions which should have been removed following visual filtering have been removed.
-
When criteria filtering has been chosen, it must be configured in the Sirilic application.
For each session corresponding to the luminance filters, the chosen parameters must be applied in the "Property" menu, "IMAGES" tab in the "Rejecting Filter" section (example: "FWHM:8.0") -
Make a backup of the Sirilc project: “File/Save” menu
-
Close the Siril application which is no longer useful and which is taking up RAM memory for nothing
To restart the preprocessing process, you must:
- Start step 1: construction of folders (the data will be erased beforehand)
- Start step 2: build and run the Siril script
🔥Warning:the script may fail if there are not at least 2 images to
preprocess in a session following the chosen filtering ctriteria (the message is
clearly indicated in the log) You will have to delete the session in this case.
6.2.4 Verifications
At the end of pass 2 of the preprocessing process, several points must be checked in the Sirilic log:
- At the end of the file, you can see the number of images that have been aligned by filter
- Check the number of images retained with the chosen criteria by searching from the end of the file upwards. Example : “Using the FWHM filter” => The number is located just below: "number of filtered-in images: 34"
- In the case of images taken with a different binning, it is necessary to ensure that the final preprocessed images have the same file size and that their dimension in pixels is at the maximum of the camera's capabilities (4656 x 3520 in my case, SIRIL chose the largest resolution during the last filter alignment step and extrapolates the bin2x2 into bin1x1)
- It may be that SIRIL has not chosen the preprocessed luminance image as a reference image for the final alignment of the filters between them: it is then possible to do this manually at SIRIL by creating a specific sequence with the preprocessed images of the filters and choosing the desired reference image to proceed with the alignment (the same goes for the alignment of sessions corresponding to the same filter)
Download the procedure in PDF format
Copyright © 2025 Olivier Ravayrol - All rights reserved
